The Stake Method
The stake method is fairly involved, but it does leave a wonderful thick coating of varnish with no fingerprints, streaks, or nail-notches from an egg drying rack. I usually do this in batches. I wait until I have several finished, empty eggs to varnish.
You can use regular varnish or polyurethane. I prefer the varnish because it results in a harder, thicker finish. Outdoor or Marine varnish is the thickest, but it does have a yellow caste to it. If your egg does not have a lot of white on it, the outdoor varnish is great. Be sure you purchase clear varnish, you don’t want any tint in it. You will need at least a quart size so you have room to lift the egg in and out of the can.
Your eggs should be emptied and completely dried. If you have been following along, they will have a thin coat of polyurethane varnish on them. This is fine and will not interfere with the thicker varnish.
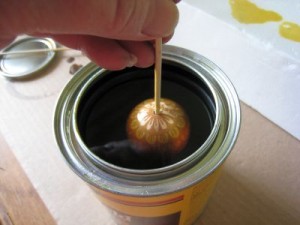
Open your can of varnish. Insert the blunt end of a bamboo shishkabob skewer through the hole of the egg. Dip the egg down into the varnish, stopping just short of covering the hole. You do not want the varnish to get inside the egg, so leave a little void around the hole.

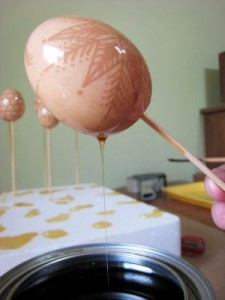
Using another stake or a wooden popsicle stick to support the egg, slowly lift out the egg and turn it upright. Let the excess varnish drain back into the can until the dripping slows. Be patient. The more you can drain off at this point, the easier it will be for you during the curing process.

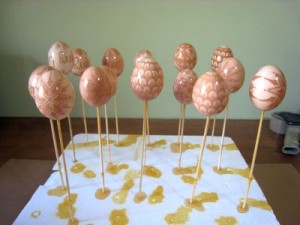
Turn the egg straight up and stick the pointy end into the chunk of styrofoam. More varnish will drip down the stake and may travel down through the styrofoam block to the table below, so be sure and protect your surface. I use a flattened cardboard box placed underneath the block.

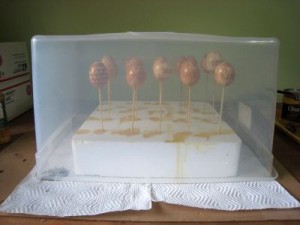
When all your eggs are sitting in the styrofoam – all pretty like an egg garden – cover the batch with a clean clear bin. This will keep dust, cat hair, and kamikaze bugs from sticking to the varnish while it cures.

During the cure time (at least 2 days), you will need to spin the eggs a few times so they do not glue themselves to the stake. Use the pointy end of a bamboo stake to turn the egg gently on the stick and loosen the seal at the hole. You should do this at first after an hour, and then again after another hour. By that time, it will have hardened enough so the egg spins freely on the stake.
If they do manage to glue themselves to the stake, you can run a razor blade around the base of the egg where the stick enters the hole, to loosen it.
Tip: When drilling the hole in your egg, be sure the opening is large enough to accommodate the bamboo skewer. Have a skewer handy to size the hole.
If you don’t want to go through all this, or you are just doing one egg, you might want to just give it one or two more coats of varnish using the same hand-held technique as described here. Let it sit overnight on the egg-drying rack until each coat is dry before you give it another coat. The more coats, the stronger the shell. There is no need to ‘sand’ the shell between each varnish coat (as it instructs on the can of polyurethane). Just put the new coat right on over the old coat.